December asks more from your living room. Guests gather, conversation clusters around seating, and winter light reveals everything. You don’t need construction to make the space feel composed.
With living room decor with fine art photography, the right focal point, proper scale, conservation-minded lighting, and anti-glare framing, the room reads refined in a single afternoon.
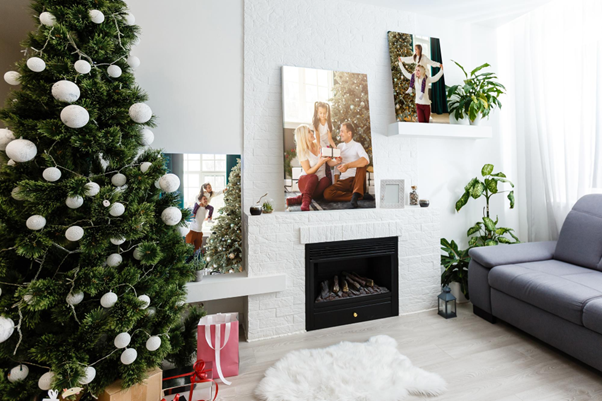
A single, confident photograph anchors the room faster than scattershot décor. Start with a reliable rule of thumb: hang so the center of the artwork sits roughly 57–60 inches from the finished floor.
This eye-level band is comfortable for both standing and seated viewing and keeps sightlines consistent across the room. Adjust slightly for unusually tall ceilings or low furniture, but use that range as your baseline.
Over a sofa or console, maintain connection without crowding. Keep about 6–10 inches between the top of the furniture and the bottom of the frame. That small gap makes the arrangement feel intentional and prevents the art from “floating.”
Scale that holds the room: for typical living rooms with 8–12 feet of viewing distance, choose a format that reads decisively. A practical proportion is about two-thirds the width of the furniture below. If your sofa is 84 inches wide, a framed width in the 54–60 inch range will usually feel balanced and substantial.
Holiday decorating introduces warmth: wool throws, natural woods, brass, candles. Black-and-white photographs organize that warmth with structure, line, and tonal rhythm. Favor images with confident midtone detail so faces and textures remain legible in both daylight and evening setups.
If you’re choosing finishes, matte or baryta-type papers present beautifully in living spaces. Pair the print with anti-reflective, UV-filter glazing to preserve tonal depth and reduce reflections from windows, string lights, and lamps. The difference in readability is immediate.
Lighting is the secret to a professional-looking reveal. It also protects the work.
Prefer more than one piece? Think in blocks.
You can lift the room’s character in a day by editing what sits near the focal piece.
Do a five-minute glare test. Sit where guests will sit, then walk toward the piece from the main entry path. If you catch a hotspot, nudge the lamp angle, lower the output slightly, or shift a floor lamp a few inches.
Small adjustments have a large effect on legibility. If reflections persist, revisit glazing: anti-reflective glass dramatically reduces mirror-like artifacts across daytime and evening scenarios.
Holiday timelines are tight. Ask for a ready-to-hang package that includes the frame, anti-reflective UV glazing, archival backing, hanging wire or cleat, and wall anchors matched to your substrate.
Request a simple diagram indicating centerline height and offsets from the furniture or mantel. With those instructions, an installer can place the piece in minutes, and you’ll avoid last-second re-hangs.
OX Fine Art delivers authorial black-and-white editions that read cleanly in winter light and are built to last. You’ll receive curated size recommendations, quick room mockups, conservation-minded framing with anti-reflective UV glazing, and a ready-to-hang package complete with centerline and spacing notes.
If you’re on a December timeline, we’ll shortlist options, coordinate white-glove delivery, and install so your living room feels composed and welcoming without touching a single tile.
| Cookie | Duration | Description |
|---|---|---|
| cookielawinfo-checkbox-analytics | 11 months | This cookie is set by GDPR Cookie Consent plugin. The cookie is used to store the user consent for the cookies in the category "Analytics". |
| cookielawinfo-checkbox-functional | 11 months | The cookie is set by GDPR cookie consent to record the user consent for the cookies in the category "Functional". |
| cookielawinfo-checkbox-necessary | 11 months | This cookie is set by GDPR Cookie Consent plugin. The cookies is used to store the user consent for the cookies in the category "Necessary". |
| cookielawinfo-checkbox-others | 11 months | This cookie is set by GDPR Cookie Consent plugin. The cookie is used to store the user consent for the cookies in the category "Other. |
| cookielawinfo-checkbox-performance | 11 months | This cookie is set by GDPR Cookie Consent plugin. The cookie is used to store the user consent for the cookies in the category "Performance". |
| viewed_cookie_policy | 11 months | The cookie is set by the GDPR Cookie Consent plugin and is used to store whether or not user has consented to the use of cookies. It does not store any personal data. |